What Is the Rule of Thirds in Photography?
If you’ve ever looked at a photo and thought, “Wow, that just looks right!”, there’s a good chance the photographer used the Rule of Thirds—a simple yet powerful composition technique that has been around for centuries. While it sounds a bit mathematical, it’s actually an artistic guideline that helps you place subjects in a way that feels natural and pleasing to the eye.
In photography, the Rule of Thirds is all about dividing your image into sections and positioning key elements along those lines or at their intersections. When you use it correctly, your pictures instantly look more balanced, engaging, and professional—without needing expensive gear or complex editing.
Let’s break it down in a simple, human way so you can start using this technique right away.
Understanding the Rule of Thirds
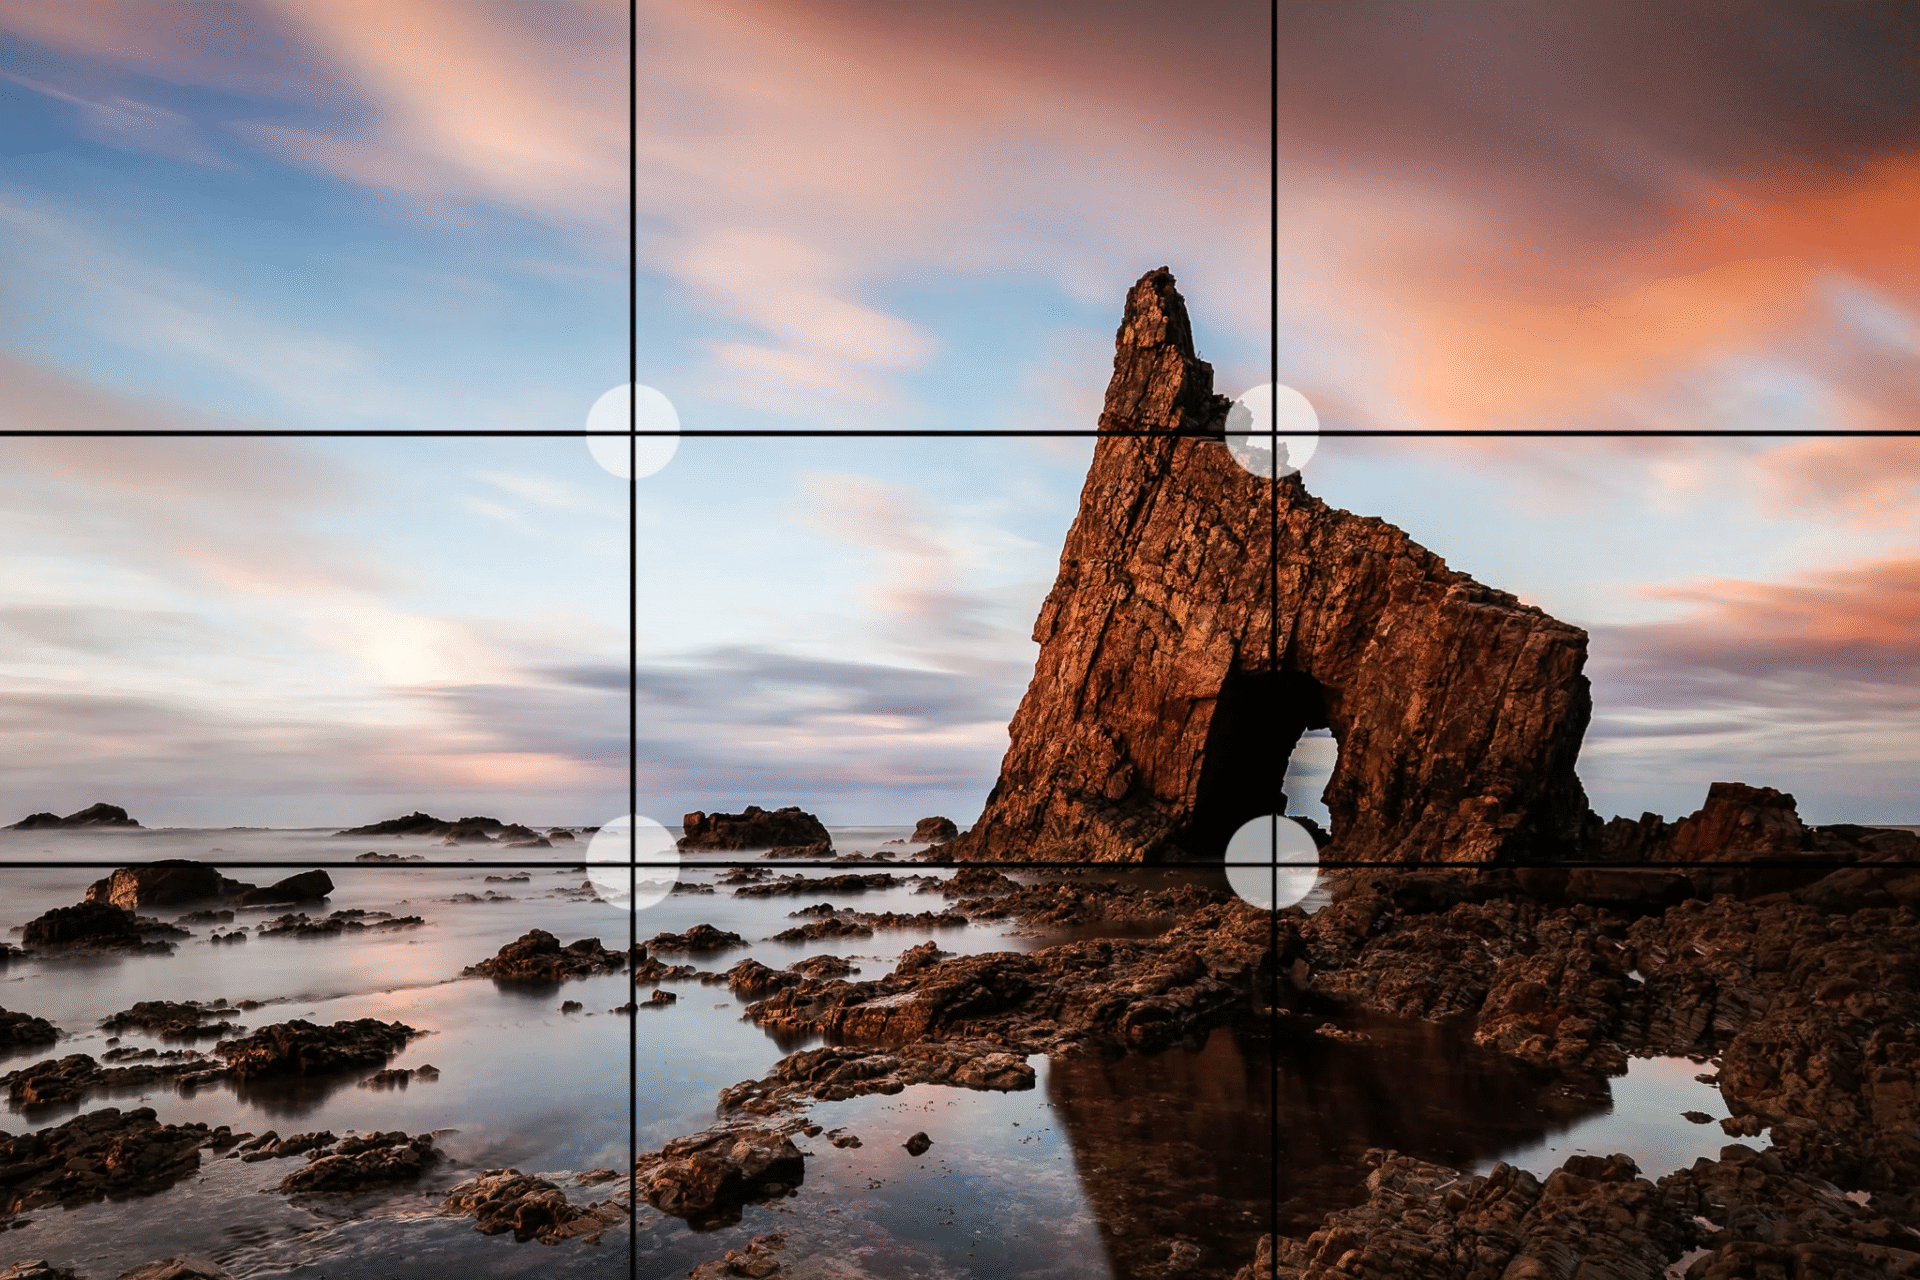
Imagine taking a photo and drawing two equally spaced vertical lines and two equally spaced horizontal lines over it. This creates a grid of nine equal rectangles—three across, three down.
The idea is to position important elements—like a person’s eyes, a tree, a building, or even the horizon—along these lines or where they intersect. These spots are called “power points” because they naturally draw the viewer’s attention.
Why does this work? Because the human brain loves visual balance, and the Rule of Thirds gently guides the eye to the most interesting parts of a photo without making it feel stiff or overly centered.
Why the Rule of Thirds Works So Well
The Rule of Thirds isn’t a random rule—it’s rooted in how humans perceive images. Our eyes tend to explore images from one point of interest to another rather than focusing right in the middle.
By placing subjects off-center:
- You create movement – The viewer’s eyes naturally travel through the image, making it feel alive.
- You add balance – The empty space around the subject gives the photo breathing room.
- You enhance storytelling – The composition helps guide the narrative of your photo, whether it’s peaceful, dramatic, or mysterious.
Think of it like writing: if you cram all your words into one paragraph, it feels overwhelming. Breaking things into sections makes it easier to read. The Rule of Thirds does the same for your pictures.
How to Apply the Rule of Thirds in Photography
Here’s how you can use the Rule of Thirds in real-life shooting situations:
1. Turn on Your Camera’s Grid
Most cameras and smartphones have a grid display option in the settings. Turn it on so you can see those nine sections while composing your shot. This makes it much easier to align subjects.
2. Place the Subject Along the Lines
Instead of centering your subject, shift it so it sits along one of the vertical or horizontal lines.
Example:
- In a portrait, position the person’s eyes along the upper horizontal line.
- In a landscape, place the horizon along the top or bottom horizontal line.
3. Use the Intersections for Maximum Impact
Where the lines cross, you’ll find four power points. Placing a key part of your subject—like an eye, a flower, or the sun—right on one of these points makes the photo naturally more interesting.
4. Balance the Empty Space
If your subject is on the left, leave some open space on the right. This is called “leading space” and it helps the photo breathe.
5. Practice and Adjust
Remember, the Rule of Thirds is a guide, not a strict law. Take multiple shots—some following the rule closely, others breaking it—and see what feels right.
Rule of Thirds in Different Photography Styles
The beauty of the Rule of Thirds is that it works in almost any type of photography. Let’s look at how it can be applied:
Portrait Photography
- Position your subject slightly off-center.
- Place the eyes along the top third line for a natural look.
- If the subject is looking in one direction, leave more space in that direction.
Landscape Photography
- Keep the horizon on either the top or bottom third.
- Use the lines to position mountains, trees, or buildings.
- Let leading lines like roads or rivers guide the viewer’s eye toward the main subject.
Wildlife Photography
- Place animals along one of the vertical lines, giving them space to move into the frame.
- Position eyes on the intersection points for strong emotional impact.
Street Photography
- Capture moments with subjects positioned off-center, letting the background fill in the story.
- Use intersections to highlight a key action or expression.
Example Table: Rule of Thirds in Action
| Photography Type | Subject Placement | Example Result |
| Portrait | Eyes on upper third line | Natural, engaging portraits |
| Landscape | Horizon on bottom third line | Balanced sky and land view |
| Wildlife | Animal’s eye on intersection point | Strong emotional connection |
| Street | Main action off-center | More dynamic storytelling |
| Food Photography | Dish on one vertical line | Eye-catching composition |
When to Break the Rule of Thirds
Yes, you can break the Rule of Thirds—and sometimes you should. If placing your subject dead center creates the impact you want, go for it.
Breaking the rule works well when:
- You want symmetry (like a reflection in water).
- You’re aiming for a minimalist or dramatic look.
- You want to focus attention directly in the center.
The key is to learn the rule first so you can break it with intention—not by accident.
Quick Tips for Mastering the Rule of Thirds
- Shoot wide – You can crop later to match the grid.
- Look before you shoot – Train your eye to spot compositions even without the grid.
- Combine with other rules – Use leading lines, framing, and depth along with the Rule of Thirds for powerful images.
- Practice daily – Even casual phone photos can be a training ground.
Conclusion
The Rule of Thirds is one of the simplest yet most powerful tools you can use to improve your photography instantly. By placing key elements along imaginary lines and intersections, you create balanced, engaging, and professional-looking images—whether you’re capturing landscapes, portraits, or everyday life.
Remember, it’s not about rigidly following the rule; it’s about understanding why it works and using it to tell your visual story more effectively. Once you’ve mastered it, you’ll find yourself naturally composing better photos—often without even thinking about it.
FAQs About the Rule of Thirds in Photography
1. Do I always have to use the Rule of Thirds?
No. It’s a guideline, not a strict rule. Use it when it enhances your composition, but feel free to break it for creative effect.
2. Can I apply the Rule of Thirds in video as well?
Yes! The same principles work in video composition, helping you create more cinematic and balanced shots.
3. Is the Rule of Thirds only for beginners?
Not at all. Even professional photographers and filmmakers use it regularly because it works for all skill levels.
4. How can I train my eye to use the Rule of Thirds naturally?
Practice by turning on the grid on your camera or phone. Over time, you’ll start framing shots this way without needing the guide.
5. What if my subject doesn’t fit neatly on a third?
Don’t stress. The Rule of Thirds is flexible—just aim to position the most important part of the subject near the lines or intersections for best results.